Venturi Compact
  • Product Overview
  • Operational Instructions
  • Downloads
  • Technical Specifications

Negative Pressure Wound Therapy (NPWT) is a mechanical wound care treatment that uses controlled negative pressure to assist and accelerate wound healing. VENTURI™ Compact NPWT Systems are a clinically proven, cost effective option for the treatment of many wounds including pressure ulcers, dehisced surgical wounds, diabetic/ neuropathic ulcers, venous leg ulcers, post surgical wounds, traumatic wounds and pre- and post-op flaps/grafts.
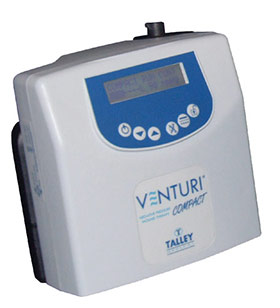
The VENTURI™ COMPACT versatile vacuum power units benefit from dual-power technology, offering a seamless choice of 110V or battery operation. The integral battery is charge-optimized, and provides long-lasting power back-up when needed, in addition to allowing the systems to function away from a 110V supply, giving the patient full mobility during therapy. Ideally suited for mobile use, the VENTURI™ COMPACT weights around 2lbs.

VENTURI 400 NPWT
  Choice of Therapy Modes

The VENTURI™ power units deliver continuous negative pressure therapy with the option to select intermittent
therapy, allowing the clinician to choose the most appropriate treatment for their patient. The system incorporates
an auto-lock device to prevent accidental modification of therapy settings once treatment begins.

Advanced Predictive Low Vacuum Alarm

The VENTURI™ systems feature an advanced predictive low vacuum warning system which continuously monitors
vacuum pressure, providing early detection of any environmental air leakage through the dressing which could
dehydrate or contaminate the wound.

  Key Product Features
  • Wound care set connection tubing features a turn and lock connector for secure attachment.
  • Y-connectors available to allow for treatment of multiple wound sites.
  • Integral canister sealing plug for secure containment of exudate prior to disposal.
  • Smaller 300ml capacity of VENTURI™ COMPACT canister minimizes overall weight and dimensions of system for
    increased portability.
  • Locking knob to secure canister to power unit and allow simple removal for canister changes.
  • Carry bag supplied to allow patient full mobility during therapy.
  ASSEMBLY
1. Remove all packaging from the power unit and remove the piece of foam protecting the metal pins on the back of the canister prior to putting it on the unit.
2. If not already in place, attach canister to flat face of power unit by matching up the rear location pegs and rotating locking knob 1/4 turn clockwise to secure. Ensure canister is correctly located and secured otherwise NO CANISTER alarm will appear and power unit will not operate.
3. Prepare and seal wound as described in wound care set instructions.
4. Attach wound care set connection tubing to the VENTURI™ AVANTI / VENTURI™ COMPACT power unit canister by lining up locator stud on tubing connector with notch on canister tubing receptacle located on top corner of canister, twisting clockwise to lock.


  BUTTON FUNCTIONS
1. RUN/STOP
Press and hold this button for 3 seconds till a beep is heard and the Standby mode is obtained. Press again to run the power unit. To turn the unit off it first must be unlocked then press the button for 3 seconds until it beeps and returns to the Standby mode. In battery operation the power unit will then power off after one minute of inactivity. If using a main power source, turn off by disconnecting the power cable from the unit or turning off the power supply.
Venturi 300 Compact
2. VACUUM LEVEL
Vacuum level can be adjusted when in stand by mode and for up to 1 minute after last button operation when power unit is running using the UP and DOWN arrow buttons. Pressure can be adjusted in 5mmHg increments between 10mmHg and 120mmHg according to treatment requirements. The power unit will begin operation at the default pressure of 80mmHg. The selected vacuum level is shown on the display screen.
3. THERAPY MODE
The VENTURI™ AVANTI / VENTURI™ COMPACT power unit offers a choice of continuous or intermittent therapy modes. On power-on, the power unit will default to continuous therapy mode. To switch between therapy modes, press and hold the THERAPY MODE button until power unit beeps to confirm change of mode. When in intermittent therapy mode, the power unit will provide vacuum therapy for periods of 5 minutes followed by a 2 minute rest period. The selected therapy mode is displayed on the power unit screen and can be altered in either stand-by or (unlocked) run modes.
4. MUTE
Press to silence alarm and to clear alarm display from display screen and to clear the unit memory.
5. UNLOCK / LIGHT
The VENTURI™ AVANTI / VENTURI™ COMPACT power unit will automatically lock 1 minute after last button operation when running to prevent inadvertent operation of button functions (except MUTE), as indicated by ‘L’ on the display screen. Press and hold the UNLOCK button until power unit beeps if further button operation is needed (i.e. change of therapy mode or vacuum level, or returning power unit to stand-by mode). The power unit will lock again 1 minute after last button operation. Pressing this button will also illuminate the display screen for 10 seconds when operated on direct electric power.


  OPERATING INSTRUCTIONS
1. If using the electric power supply, plug the smaller end of the power cable into the side of the VENTURI™ AVANTI / VENTURI™ COMPACT power unit, and the other end into mains outlet in wall. NB. The battery will charge when the unit is connected to mains power (indicated by battery charge status icon on display screen scrolling from left to right) and provides automatic power back-up if mains power fails. It is recommended to use power when convenient to do so as this will ensure the battery is fully charged when needed. Venturi 300 Compact
2. Press RUN/STOP button to invoke and display STAND-BY mode (the unit will beep and therapy mode, operating pressure and battery charge status will be displayed).
3. The unit will default to continuous therapy mode at 80mmHg. To switch between continuous and intermittent therapy modes, press and hold the THERAPY MODE button until power units beeps to confirm change of mode. Adjust vacuum level if required using the UP and DOWN arrow buttons.
4. Press RUN/STOP button again to initialize and run the power unit. NB. Vacuum level and therapy mode can be adjusted when in stand-by mode and for up to 1 minute after power unit is running. Power unit will automatically lock 1 minute after last button operation when running to prevent inadvertent operation of button functions (except MUTE), as indicated by 'L' on the display screen. Press and hold the UNLOCK button until power unit beeps if further button operation is needed. Display screen is only illuminated for a short period after button operation in battery mode.
5. Once power unit is running, observe the wound site. The dressing should contract noticeably, become firm to the touch and 'raisin-like'. If the dressing fails to contract, the dressing has not been completely sealed.
6. To change or remove dressing, unlock power unit (press and hold UNLOCK until power unit beeps), then press and hold the RUN/STOP button until power unit beeps three times to return to stand-by mode. Clamp wound care set tubing and remove by turning anticlockwise and lifting out of tubing receptacle on canister. Dispose of used wound care set according to local clinical waste policy. If required, apply new wound care set and continue NPWT.
7. Canisters should be replaced as required or weekly. To change canister, make sure power unit is in stand-by mode (if still running, press and hold the UNLOCK button, followed by the RUN/STOP button). Clamp connection tubing and remove by turning anticlockwise and lifting out of tubing receptacle (this can be reconnected to new canister and unclamped if wound dressing is not being changed). Remove sealing plug from its location on top corner of canister and use to cap tubing receptacle to seal in contents. Rotate locking knob 1/4 turn anticlockwise and remove canister. Dispose of used canister according to local clinical waste policy. If continuing NPWT, attach new canister and connect wound care set tubing as previously described.
8. To stop the power unit, press and hold the UNLOCK button until power unit beeps and 'L' clears from display screen. Then press and hold the RUN/STOP button until power unit beeps three times to return to stand-by mode. In battery operation the power unit will then power off after one minute of inactivity. If using mains power, switch off by disconnecting power cable from power unit or turning off main power
9. Place the user manual in a safe place for future use.
 
  NPWT SYSTEM VIDEOS
CLICK HERE TO VIEW SERVICE VIDEO OF HOW THE VENTURI COMPACT300 OPERATES

training

  AVAILABLE LITERATURE
compact AME VENTURI 300 AME Venturi™ One Page Slick CLICK HERE
AME 1000MOB venturi 300 compact AME Venturi™ Compact Brochure CLICK HERE
venturi owners AME Venturi™ User Manual CLICK HERE
venturiquick Venturi Quick Overlook AME Venturi™ Quick Usage Guide CLICK HERE
Click here to download Adobe Acrobat Reader.
  SPECIFICATIONS

Construction

Flame retardant ABS

Dimensions

161mm x 155mm x 90mm

Weight

1.0KG

Mains Cable

3 meters

Operating Voltage

3.7V

Peak Current

450mA PMS

Max. Load Wattage

12W

Vacuum Application

Continuous (default therapy) or intermittent

Vacuum Levels

10-100mm
Pressure Range 10 to 120mmHg
Intermittent-pressure setting Occlusive Portable Prepares wound bed
  CANISTER

Construction

ABS Trans smoked grey, textured (includes 1 x 8g dis-solvable sachet of desiccant)

Dimensions

156mm x 163mm x 45mm

Capacity

300ml

© American Medical Equipment - 2013. All Rights Reserved.